Showing posts with label Cookies. Show all posts

Tuesday, November 23, 2010

Heeeeere Turkey, Turkey, Turkey!

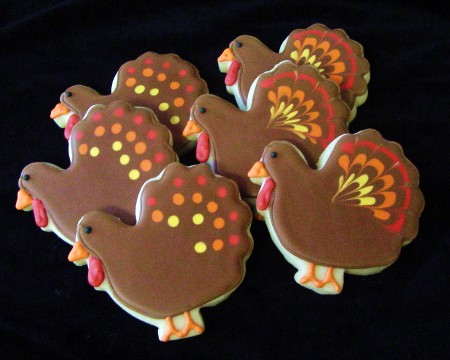
So remember my list of baking I want to do in the next few weeks? Well, I completed one of them! I made Bake at 350's turkey cookies! I used her sugar cookie and royal icing recipes and they turned out perfectly! Here is the finished product.


Sorry it isn't that great of a picture. My piping/decorating skills aren't perfect by any means, but I still love my cute little turkeys! It was easier than I was anticipating and SO YUMMY! I've always been fine with sugar cookies, but this recipe is just better than the plain ol' recipe I used to use. We took some over to a friend's house the night I made them and they were impressed. Not only with how they looked, but how they tasted. My friend's husband said he isn't a sugar cookie fan, but he really enjoyed those! I already have plans to make snowflake sugar cookies for my Christmas cookie exchange coming up for people to nibble on. If you've never decorated your cookies with royal icing, I highly recommend trying it out. It is so much fun!

Thursday, November 18, 2010

Keep Calm and BAKE ON!

One thing you should know about me is that I love to bake! I love to try different cookie recipes and decorate my creations. I have a few new things I'm going to be trying out here in the next month or so.

First of all, I am hosting my 2nd Christmas Cookie Exchange! I tried a new cookie recipe last year (Red Velvet Shortbread cookies) and am going to make a new one again this year. I have two recipes I want to try and in the next few weeks (with a short break because my husband is going to be leaving for school and he sneaks cookies as soon as I get them out of the oven is my taste tester) to decide which one to take to the cookie exchange. Choice number one is Alfajores (Argentine Caramel Sandwich cookies).


photo from Better Homes and Gardens

Choice number two is Cinnamon-Sugar Roll cookies.


photo from Better Homes and Gardens

How delicious do those look? I can't wait to try them out!

Now, I've made many batches of cake pops and have even decorated my daughter's 2nd birthday cakes (two regular cakes and two mini cakes). I LOVE making cake pops and the cakes were generally very fun to make (though I honestly did get frustrated at times since it was my first time). I also really admire all the cookies Bridget makes over at Bake at 350. I have finally decided to try out decorating cookies with royal icing! Yeah, I'm sure I'll get frustrated at times since I really have no idea what I'm doing, but I'm excited to try it out. Maybe I'll find a new passion! Then again, if I fall in love with it, I'll be making cake pops and decorated sugar cookies for every get together I go to. Not that anyone has ever complained that I bring cake pops wherever I go. ;) Anyway, since Thanksgiving is a week away, this weekend I will be making these cute treats.


photo from Bake at 350.

Well, I'll be trying to make them, at least. :) Like I always say, even if they don't turn out cute, they'll still be yummy!

Stay tuned because I will definitely be posting how everything turns out. First up... the adorable turkey cookies!

Monday, April 19, 2010

Hollywood Cookies

So awhile ago I got an email that said the PTO was throwing a Hollywood Extravaganza party for the kids that go to the elementary school here. They were asking for volunteers to help out as well as people to donate baked goods. I perked up at that part! Of course I would bake something to take to the elementary school! I'm always looking for a reason to bake.

Now, I couldn't just make any old cookies. Oh no! I had to do something cute. So I bought a couple of those aluminum cookie sheets (that way they could toss them afterward without having to worry about returning my pans to me). These things were FLIMSY and even with two stacked on top of each other I had to be really careful so it wouldn't just tip over. I also borrowed some cookie cutters from a good friend of mine because, believe it or not, I have very few cookie cutters! EEK!!!! I only have a few mini ones and Halloween ones. How the heck that happened, I don't know. But I am starting to collect more. My first major purchase will be a kit with the basic stuff like numbers, letters, circles, holiday themed, etc.

Anyway, I took one of these tins and some blue and green construction paper. I trimmed everything to make it look like sky and hills. Then I cut out letters to spell out "Hollywood" and put the letters among the hills. That's right.... a template for the Hollywood Hills.

I then made sugar cookies and cut them out to spell "Hollywood" and made a bunch of stars. I frosted the letters with white frosting and tinted the rest yellow for the stars. I only frosted some of the stars because, well, I was lazy. But it ended up looking really good with every other star yellow. This just didn't look like enough cookies to take, and I happened to have an extra box of cake mix on my hands, so I made a quick batch of Cake Mix Cookies (I've seen this recipe on many websites, but this is the very first place I read about it). It was the first time I made these and they were pretty good! I had strawberry cake mix sitting around but I think it would be even better with chocolate. Yum!!! Anyway, here is what it looked like once everything was done.

I was pretty proud of my creation! I wish I could have stuck around to see how the kids liked them!!

Wednesday, February 3, 2010

Mickey Oreos Revisited

Remember these tasty little treats? Remember how I said I had BIG plans for them? Well, I tried to take that pretty little picture I had in my head and make it reality. Did it work? Ehhh, let's just say please keep in mind this was my very first time working with fondant, not to mention I was super excited and was probably in a hurry to see the final product!


Does this give you an idea of what I did? No? Okay, how about this...


Still no? Okay then.


You know you have the Mickey Mouse Club March stuck in your head again. And you're welcome. :)

I know it is far from perfect, but I'm proud of it. I know what I did wrong and how to fix it next time I work with fondant. I have a new project in mind with the rest of the fondant I ordered. Nope, nothing to do with Disney. It'll be a Valentine's Day treat. We'll see how it turns out! Practice makes perfect, right?

Wednesday, January 20, 2010

Who's The Leader of the Club That's Made For You and Me?


M-I-C... K-E-Y... M-O-U-S-E!!! In chocolate-covered Oreo form! ♥ Yes, trust me, I know! The other day I was going through major Disney withdrawal. We are barely starting to plan our October trip to Walt Disney World (more about that in a later post) and I am just already itching to go. Plus I love baking and really wanted to make something kinda cool. I knew I wanted to combine these two things and make something Disney-inspired. I thought and thought but just couldn't come up with something that seemed perfect.

Picture found at Pooh the Bear

Then it came to me in the shower (yes, I'm one of those who does my best thinking in the shower). At first I really wanted to do these as cake pops. Because we all know how incredible cake pops are! But I had just done Christmas cake pops and have already planned on making some for Easter (cute little chicks? Easter eggs? Not sure yet.) so I thought I would lay off of the cake pops until then.

It is then that I remembered I really wanted to try out the dipped Oreos that Jamie at Momma's Playground did for Christmas. We always take each other's ideas and give them our own little twist. I love that. She took my reindeer cake pops, turned them into Oreos, and now I'm turning her Oreos into Mickey pops! You don't understand how excited I was to try this! I stuck a popsicle stick into the Oreo, dipped them into melted chocolate candy melts, and stuck them in the freezer. Once they were hardened, I dipped some whole candy melts into melted ones and stuck them on as ears.


I just LOVE them! But, they look a little plain, don't they? I have BIG plans for these little guys. But, I live in the middle of nowhere and have to order a lot of things offline so it will be a little while before I can reveal that little secret. ;)

Thursday, December 24, 2009

Cookie Exchange

I can't believe it is Christmas Eve already! I am so excited. Baby Girl was 3 months old last Christmas so she didn't really know what was going on. She doesn't know what Christmas means or anything yet, either, but she knows she loves all the lights and she'll be able to open her presents herself and all that fun stuff. I can't wait for her and hubby to open their presents tonight after dinner, hot chocolate, and a reading of The Night Before Christmas. *sigh* I love Christmas!

Today I thought I'd post a couple of pictures of the cookie exchange I hosted this past Saturday. Well, technically the pictures are just of the goodies because I forgot our camera in the diaper bag that hubby kept with him since he watched Baby Girl, but that's okay. :) I had never even been to one before, but I really wanted to make sure there was one on island this year.

I ordered some gingerbread boy and girl themed decorations from Oriental Trading. They were super cute! I made some hot chocolate in the crock pot and some reindeer cake pops for dessert.

A couple of people volunteered to bring some hors d'oeurves and punch to help out, which was wonderful! It took a little bit of stress off and saved me a little bit of money! There were 10 of us that came and everyone brought such delicious cookies!


I made little recipe books with the recipes of the cookies people brought (at least those that people emailed me beforehand) for everyone to take home with them so they can make their favorites from the party.


It was really simple. I just printed them out with a cute little Christmas tree graphic in the corner, trimmed them down, punched a hole in the corner, and tied a ribbon to keep it together.

Oh, and of course I had some Christmas music playing in the background! :)

It was really SO much fun and I already know I want to do it again next year! Have a wonderful Christmas Eve!

Thursday, December 17, 2009

Holly Bloggy Christmas Bash - Christmas Recipes

Photobucket

Today's all about those wonderful recipes, old and new, that we all make for Christmas. I'm pretty late getting today's Holly Bloggy post up because, well, I am in the middle of making some of those delicious treats! Growing up, my favorite cookies were Chocolate Crinkles. I still love them! I also love Brown-Eyed Susans (that's what my mom called them - peanut butter cookies with Hershey's Kisses pressed in them). They were always my mom's favorite. I call them Brown-Eyed Ashlyns now, because of my daughter. :)

Today I've been making treats for my family and those coming to the Christmas Cookie Exchange I'm hosting this Saturday evening. I can't wait! I'm making Red Velvet Shortbread Cookies (the link has the recipe).


I am also making cake pops. I've made these a few times after seeing them on Bakerella's website and everyone who tries them LOVES them! I'm going to be decorating them like reindeer... hopefully they turn out even half as cute as these.

Simply Sweet Home is hosting the Holly Bloggy Christmas Bash today (thank you!) so join me in going over and seeing what yummy things other people are making!

Tuesday, December 8, 2009

Red Velvet Shortbread Cookies

I mentioned changing up a recipe a little bit for Red Velvet Shortbread Cookies in my National Cookie Day post. When I made them with the original recipe from Better Homes & Gardens, they were delicious, but hubby wasn't crazy about the cocoa aftertaste. It was better once the white chocolate went on, but I decided to play around with it a little. So instead of 2 Tbsp. unsweetened cocoa powder, I put 1 Tbsp. unsweetened cocoa and 1 Tbsp. hot chocolate mix. DELICIOUS!!! It tastes like the first batch I made but without the aftertaste. Hubby said they were perfect. Trust me, the original recipe is wonderful, but this just suits our tastes even more. Here is the recipe with my twist:

Red Velvet Shortbread Cookies

You will need:
  • 1 1/4 cups all-purpose flour
  • 1/3 cup sugar
  • 1 Tablespoon unsweetened cocoa powder
  • 1 Tablespoon hot chocolate powder mix
  • 1/4 teaspoon salt
  • 1/2 cup butter, cut up
  • 1 tablespoon red food coloring
  • 3 ounces white chocolate (with cocoa butter), coarsely chopped
  • 1 1/2 teaspoons shortening
  • Finely chopped nuts, sprinkles, or nonpareils (optional)
Directions:

1. Preheat oven to 325 degrees F. Combine flour, sugar, cocoa powder, hot chocolate powder, and salt. Add butter and red food coloring. Combine (by hand or food processor) until it resembles fine crumbs. Mix/process until mixture just forms a ball.

2. On a lightly floured surface, knead dough lightly until nearly smooth. Roll or pat dough to a 1/2-inch thickness. Using a floured 1-1/2-inch round cutter, cut out dough. Place cutouts 1 inch apart on an ungreased cookie sheet. Press scraps together and reroll.

3. Bake in the preheated oven for 20 to 25 minutes (20 worked perfect for me) or until centers are set. Transfer cookies to a wire rack; let cool.

4. In a heavy small saucepan, melt white chocolate and shortening over low heat, stirring constantly (honestly, I didn't add the shortening). Dip half of each cookie into melted chocolate. If desired, sprinkle with nuts or sprinkles. Let stand on waxed paper until set. Makes about 24 cookies.

Please don't mind the not-so-great dipping technique I used. I was short on white chocolate and had to maneuver the cookies around instead of just dipping. :) And I have decided that these are going to be the cookies I take to the Christmas Cookie Exchange I am hosting soon. I hope everyone likes them!!